[筆記] 在 VSCode 設定 Verilog 開發環境 (Windows)
有鑑於 Vivado 的 code editor 實在太難用了 所以移到 VSCode 上來開發
來紀錄一下環境設置
## 安裝
1\. Extension
先到 [Verilog-HDL/SystemVerilog/Bluespec SystemVerilog](https://marketplace.visualstudio.com/items/mshr-h.VerilogHDL) 去安裝
這時候基本上只有 snippet 的功能
2\. `ctags`
參考[這裡](https://github.com/mshr-h/vscode-verilog-hdl-support#installation-of-universal-ctags)來安裝
這個可以提供變數自動完成、go to definition 等功能
然後記得要把他加到環境變數
3\. `iverilog`
參考[這裡](https://iverilog.fandom.com/wiki/Installation_Guide)安裝
提供 linting 的功能
然後他會自動加進 path 不用自己再設
## 設定
如果你有裝 [Bracket Pair Colorizer 2](https://marketplace.visualstudio.com/items?itemName=CoenraadS.bracket-pair-colorizer-2)
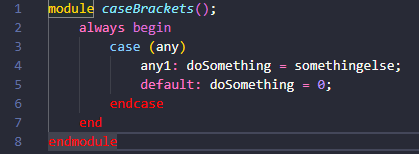
可能會遇到 `endcase` 會搞爛上色的問題:

(可以參考 issue:
- https://github.com/CoenraadS/Bracket-Pair-Colorizer-2/issues/328
- https://github.com/CoenraadS/Bracket-Pair-Colorizer-2/issues/371)
在 `settings.json` 加上
```
"bracket-pair-colorizer-2.excludedLanguages": [
"verilog"
]
```
可以暫時先關掉 verilog 的上色 現在只能坐等他修好
## 使用
安裝完 `iverilog` 後 也可以直接在本機上面 run 你的 verilog code 了
首先透過 `iverilog code.v` 來編譯 預設輸出到 `a.out` 可以加 `-o <name>` 來指定輸出檔名
接著就可以使用 `vvp a.out` 來執行 不過在工作站上面用 `ncverilog` 還是比自己電腦快多了(
另外 在編輯 verilog code 的時候 若有使用其他檔案的 module 要記得 include
因為 iverilog 沒辦法自己去抓 否則會報錯
Reference:
https://github.com/mshr-h/vscode-verilog-hdl-support
2021-10-09 14:44:25
留言
Last fetch: --:--
現在還沒有留言!